If Kernel-mode Hardware-enforced Stack Protection is off and cannot be turned on, then this post is sure to help you resolve the issue.

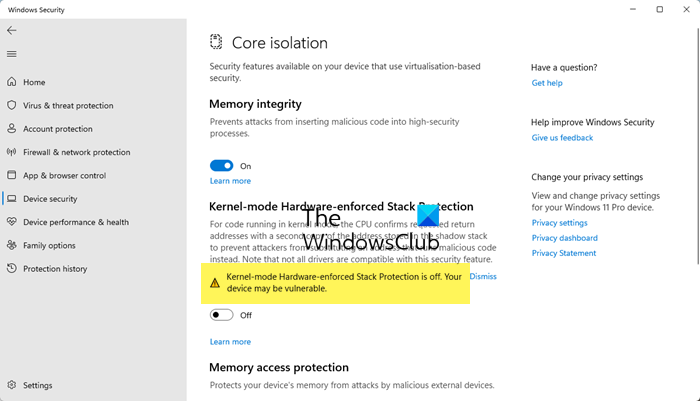
Kernel-mode Hardware-enforced Stack Protection is off. Your device may be vulnerable.
For some users, the toggle to Kernel-mode Hardware-enforced Stack Protection is greyed out. And, for others, the toggle turned off immediately after turning it on. It is more likely caused by incompatible drivers and/or apps that come with anti-cheat software. While the feature is installed automatically as part of a mandatory security update, users find that Kernel-mode Hardware-enforced Stack Protection is disabled on their systems by default, and they just can’t turn it on.
What is Kernel-mode Hardware-enforced Stack Protection
Kernel-mode Hardware-enforced Stack Protection is a security feature of Windows 11 22H2 that can be used with supported processors. It is part of a recent Microsoft Defender update and helps to protect your system against stack buffer overflow attacks and various other memory attacks. This feature replaces LSA (Local Security Authority) protection feature in Windows Security.
Kernel-mode Hardware-enforced Stack Protection is off
If the Kernel-mode Hardware-enforced Stack Protection is turned off and can’t be turned on in your Windows 11 system, use the following solutions:
- Check if the CPU supports Kernel-mode Hardware-enforced Stack Protection
- Turn on CPU Virtualization in BIOS
- Review Incompatible Drivers and Update them
- Uninstall the problematic app
- Enable Kernel-mode Hardware-enforced Stack Protection using Registry
- Enable Data Execution Prevention (or DEP)
- Update BIOS.
Let’s have a look at these solutions one by one.
1] Check if the CPU supports Kernel-mode Hardware-enforced Stack Protection
Kernel-mode Hardware-enforced Stack Protection feature requires Shadow Stacks (a temporary memory stack) which further requires Intel’s Control Flow Enforcement Technology (CET) technology. So, this is a hardware-based security feature available in newer CPUs (or processors) such as AMD Zen3 CPU or later and Intel Tiger Lake processor. If your device doesn’t include a supported CPU, then you can’t use or turn on this feature. So, first, check your CPU specifications to find out if your CPU supports Kernel-mode Hardware-enforced Stack Protection. If yes, you can turn it on with the solutions covered in this post below.
2] Turn on CPU Virtualization in BIOS

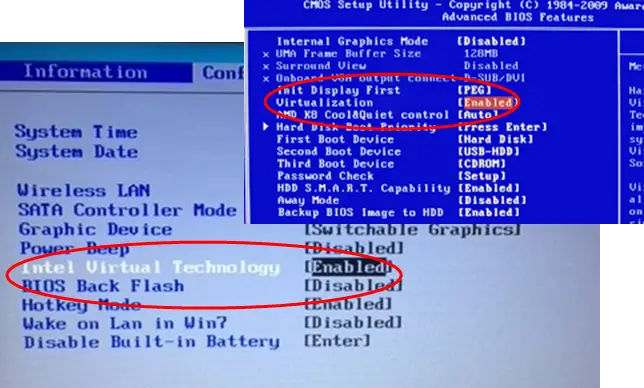
Along with a supported CPU, Kernel-mode Hardware-enforced Stack Protection requires CPU virtualization (a hardware feature) in BIOS to work. Otherwise, you won’t be able to turn it on. So, you have to enable hardware virtualization in Windows BIOS if your CPU supports it.
So, first, boot the Windows computer into UEFI or BIOS firmware, and switch to the Advanced tab or Configuration tab or System Configuration tab (depending on the device you’re using like HP, Acer, etc.). Look for an option that says Virtualization or Virtualization Technology, use the Enter key, select the Enabled option, and press the F10 key. Confirm the changes using the YES option.
Once the CPU virtualization is enabled, you should be able to turn on the feature.
3] Review Incompatible Drivers and Update them

Some device drivers are not compatible with this security feature of Windows 11. So, unless there are incompatible drivers, the Kernel-mode Hardware-enforced Stack Protection option can’t be turned on. Thankfully, there is a way to fix this issue as the feature itself provides a list of incompatible drivers that you can review to update.
Do note that this solution can be used only if the Kernel-mode Hardware-enforced Stack Protection toggle can be used. If the option is greyed out, then you need to check other solutions.
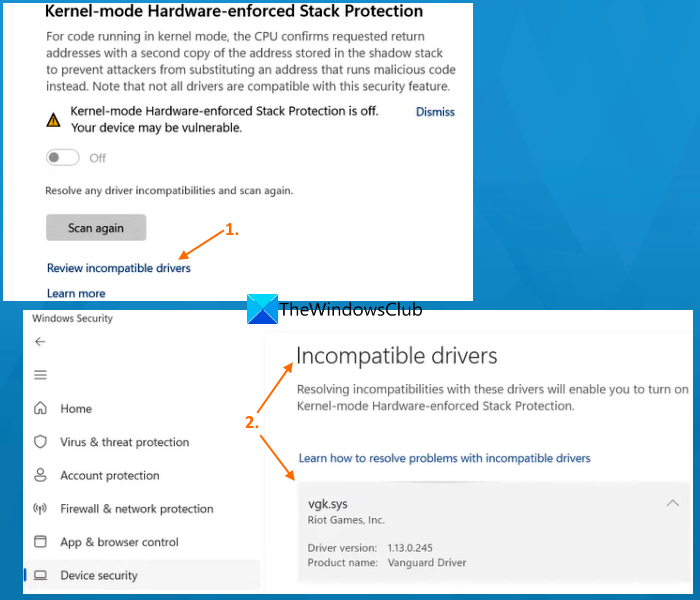
First of all, open the Windows Security app, access this feature, and use the toggle available for this feature to turn it on. The toggle or button will automatically turn off immediately. After that, click on the Review incompatible drivers option (as visible in the image above). Now a list of Incompatible drivers like BEDaisy.sys, vgk.sys, etc., will be visible. Mainly, the list contains game-related drivers but you may find conflicting drivers for other apps also.
Note: For some users, the Incompatible drivers section was empty and didn’t show any drivers in the list. But, if you see a list of such drivers, it will be easier to fix the issue.
Select a driver from the list and you can see the program or app associated with that driver, product name, and driver version. It doesn’t provide an option to update drivers that may fix incompatibility issues so you need to do it manually.
To update drivers on Windows PC, you can either download the latest version of required drivers from the official website or manufacturer’s website or use the Optional updates section of Windows Update in the Settings app to check if driver updates are available to download and install.
Restart your PC and see if you are able to turn on the Kernel-mode Hardware-enforced Stack Protection feature. This should work. If not, press the Scan again button available just below this feature to check other incompatible drivers and update them. You can also disable or uninstall the incompatible drivers, but then it will make the associated devices stop working.
4] Uninstall the problematic app
This is one of the effective solutions when you are unable to turn on Kernel-mode Hardware-enforced Stack Protection. As mentioned in starting, there are some drivers or apps (especially games with anti-cheat systems like Riot Vanguard (vgk.sys), BattleEye (BEDaisy.sys), Genshin Impact, Bloodhunt, GameGuard, etc.) that are not compatible with this security feature. So, in order to run smoothly, such apps may interfere with this feature and disable it. If this is the case, then you need to uninstall the conflicting apps/programs, restart your device, and see if this helps to solve the problem.
Open the Settings app (Win+I), access the Apps category, and select the Installed apps section. Click on the More icon (three vertical dots) for an app or program that conflicts with this security feature, and press the Uninstall option. In the confirmation pop-up, use the Uninstall button to remove it from your system.
5] Enable Kernel-mode Hardware-enforced Stack Protection using Registry

You can also use Registry Editor to access or create a Registry entry that overrides the feature settings to enable kernel-related protection with a feature-specific value data number. In this case, we are going to access or create the same Registry entry and then enter the value data required for enabling the Kernel-mode Hardware-enforced Stack Protection feature. Before you use this option, we recommend you take a backup of your Windows Registry. After that, follow the steps added below:
- Type regedit in Windows 11 Search box and hit Enter to open the Registry Editor
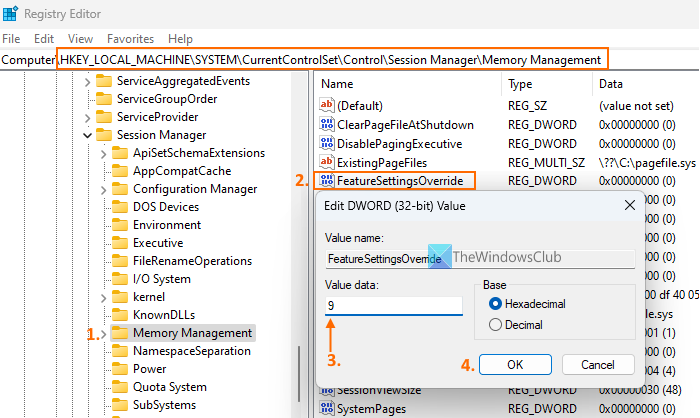
- Access the Memory Management Registry key where multiple memory-related settings (such as enable/disable paging executive, paging files, paged pool size, etc., are present). The path to jump to this key is:
HKEY_LOCAL_MACHINE\SYSTEM\CurrentControlSet\Control\Session Manager\Memory Management
- On the right-hand section, look for the FeatureSettingsOverride DWORD value. If it is not present, then create it manually. Right-click on an empty area, New menu, and click on DWORD (32-bit) Value option. When this value is created, name it FeaureSettingsOverride
- To enable the Kernel-mode Hardware-enforced Stack Protection feature, you need to set the Value data of FeatureSettingsOverride value. To do this, double-click that value
- A small pop-up appears. Here, put 9 in the Value data
- Press the OK button
- Close the Registry Editor.
Restart your system if needed. Now the Kernel-mode Hardware-enforced Stack Protection feature shouldn’t be greyed out anymore and you will be able to turn it on.
6] Enable Data Execution Prevention (or DEP)
DEP or Data Execution Prevention is a built-in system-level memory protection feature in Windows PC that marks some memory regions as non-executable to prevent exploitation of buffer overruns. And, Kernel-mode Hardware-enforced Stack Protection feature also prevents memory attacks. So, if DEP is disabled on your system, then this could be the reason that you see a warning that Kernel-mode Hardware-enforced Stack Protection is off and you can’t turn it on. In such a case, you first need to enable Data Execution Prevention on your PC.
Open Command Prompt as administrator and execute the following command:
bcdedit.exe /set {current} nx AlwaysOn
Here BCDEdit is a command-line tool that enables DEP or No-Execute (NX) on your system for all services and programs. Restart the PC and try to turn on the Kernel-mode Hardware-enforced Stack Protection feature. Your problem should be gone now.
7] Update BIOS
This option worked for one of the users having the same problem. So, in case the above options don’t help, then you should update BIOS on your Windows computer, and then try if you can turn on the Kernel-mode Hardware-enforced Stack Protection.
Hope this will be helpful.
How do I turn off hardware stack protection?
To turn on/off Kernel-mode Hardware-enforced Stack Protection feature on your Windows 11 PC, open the Settings app > Privacy & security > Windows Security > and click on Open Windows Security. When the Windows Security app is opened, switch to the Device security category, and click on the Core isolation details option. Below the Memory integrity section, the Kernel-mode Hardware-enforced Stack Protection section is present. Use the available button to turn it off or on.
Though the option to turn on/off this feature is present, it is a crucial security feature. It prevents Return Oriented Programming (ROP) based buffer overflow attacks by blocking the malicious code execution from memory. Therefore, it is recommended to keep this feature turned on for additional security to keep your system protected from such attacks.
Read next: How to Enable or Disable Core Isolation and Memory Integrity in Windows PC.